Android Screen Components
A UI in android is defined in an xml file. During
compilation, each element in the XML is compiled into equivalent Android GUI
class.
View
& ViewGroup
View is the basic building blocks of User
Interface (UI) elements in android. It is a superclass for all GUI components in Android.
Android contains the following commonly used View subclasses:
- TextView
- EditText
- ImageView
- ProgressBar
- Button
- ImageButton
- CheckBox
- DatePicker
etc.
The ViewGroup class
is a subclass of the View class. View Group is the invisible container that holds View and View
Group, eg: LineraLayout is the ViewGroup it contains Button(View) and other
Layouts also. ViewGroup is the base class for Layouts.Android contains the
following commonly used ViewGroup subclasses:
- Linear Layout
- Relative Layout
- List View
- Grid View
LinearLayout
In this layout all the
elements are arranged in a linear way depending upon the orientation which can
be vertical or horizontal.
<?xml version=”1.0” encoding=”utf-8”?>
<LinearLayout xmlns:android=”http://schemas.android.com/apk/res/android”
   android:layout_width=”match_parent”
   android:layout_height=”fill_parent”
   android:orientation=”vertical” > //this orientation can be
                                      vertical/horizontal

   //TextView is used to simply display a text on screen
   <TextView
      android:layout_width=”match_parent”
      android:layout_height=”wrap_content”
      android:text=”Linear Layout Example”
    />

   //EditText is used to take input from user
   <EditText
      android:layout_width=”match_parent”
      android:layout_height=”wrap_content”
      android:hint=”Enter your name”
      android:id=”@+id/name”
    />

   <Button
      android:layout_width=”match_parent”
      android:layout_height=”wrap_content”
      android:text=”Click here”
      android:id=”@+id/btn1” // here id specifies unique identifier for
                                each element through which we can
                                identify that element
   />

</LinearLayout>
RelativeLayout
In this layout all the elements are arranged on the
screen with respect to other elements.
<?xml version="1.0" encoding="utf-8"?>
<RelativeLayout xmlns:android="http://schemas.android.com/apk/res/android"
    android:layout_width="fill_parent"
    android:layout_height="fill_parent" >

    <Button
        android:id="@+id/btnButton1"
        android:layout_width="wrap_content"
        android:layout_height="wrap_content"
        android:text="Button 1"/>

    <Button
        android:id="@+id/btnButton2"
        android:layout_width="wrap_content"
        android:layout_height="wrap_content"
        android:text="Button 2"
        android:layout_toRightOf="@+id/btnButton1"/>

     <Button
        android:id="@+id/btnButton3"
        android:layout_width="wrap_content"
        android:layout_height="wrap_content"
        android:text="Button 3"
        android:layout_below="@+id/btnButton1"/>

     <TextView
         android:id="@+id/textView1"
         android:layout_width="wrap_content"
         android:layout_height="wrap_content"
         android:layout_below="@+id/btnButton3"
         android:layout_marginTop="94dp"
         android:text="User :"
         android:textAppearance="?android:attr/textAppearanceLarge" />

     <EditText
         android:id="@+id/editText1"
         android:layout_width="wrap_content"
         android:layout_height="wrap_content"
         android:layout_alignParentRight="true"
         android:layout_alignTop="@+id/textView1"
         android:layout_toRightOf="@+id/btnButton3" />

     <Button
         android:id="@+id/btnSubmit"
         android:layout_width="wrap_content"
         android:layout_height="wrap_content"
         android:layout_alignParentRight="true"
         android:layout_below="@+id/editText1"
         android:text="Submit" />
Activity
An
activity is an android component that represents a single screen with which the
user interacts
The
Activity class defines the following call backs i.e. events. You don't need to
implement all the callbacks methods. However, it's important that you
understand each one and implement those that ensure your app behaves the way
users expect.
Toast
In
Android, Toast is a notification message that pop up, display a
certain amount of time, and automatically fades in and out, most people just
use it for debugging purpose.
Toast.makeText(getApplicationContext(),"Login Successful",1).show();
For
more deatls, visit this site: http://www.mkyong.com/android/android-toast-example/
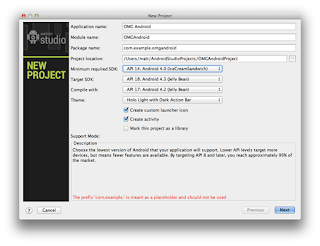
Creating first android app:
1.
Create a New Project on Android Studio
6. Go to folder res > layout >
Create your xml file under this folder. Two xml
files are by default defined in this folder i.e. activity_main.xml,
fragment_main.xml. You can either user these or create your own.
7. Go to folder src>main>java>”your package”>”your
Activity”
Here you can define the activities of your app. Within the
activity, in onCreate() there is a method named
setContentView(R.layout.activity_main), within this method you can specify your
layout name i.e. R.layout.<your layout>
Important links:
- Android project Directory structure: http://javatechig.com/tools/android-studio-project-structure
- Creating first Android app: http://www.raywenderlich.com/56107/make-first-android-app-part-1
- http://www.sitepoint.com/12-android-tutorials-beginners/
LLets continue next topic here.


0 comments:
Post a Comment